
Are you ready to brew your very own kombucha? The healthy fermented tea that’s good for your gut is the real deal, and I have the steps to get your first batch brewed and ready to serve.
Whatever your reasons for learning how to make kombucha for beginners, the first step is to get started.
Here you will learn how to make basic kombucha from beginning to end without needing any advanced equipment or ingredients.
There are only three main steps to brew kombucha, well maybe four, but second fermentation and bottling kind of go together, so really no more than four steps, I promise.
- Make SCOBY (1-4 weeks) – Other names are raft, mother, mushroom, that weird pancake thing
- First Fermentation (6-10 days) – Brew Kombucha Tea
- Second Fermentation/Bottling (3-10 days) – Carbonate Kombucha Tea
- There is no step four, but there are steps within the steps!
If you purchase a recommended product after clicking one of our links in this post, we may earn a commission.
How To Make a Kombucha SCOBY
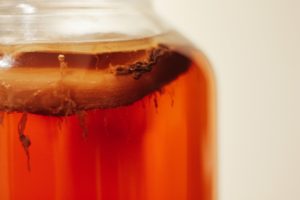
SCOBY is an acronym for (Symbiotic Culture of Bacteria and Yeast) which is an ingredient that aids in the fermentation and production of delicious Kombucha.
Making your own SCOBY is simple and only requires a few readily available ingredients. Still, if you have a friend who already brews (ask if they have an extra) or if you want to jumpstart your foray into kombucha brewing and get straight to first fermentation, you can purchase a ready-made SCOBY and skip to First Fermentation.
Ingredients Needed To Make a SCOBY
- 7 cups filtered water
- ½ cup white cane sugar
- 4 bags black tea or one tablespoon loose leaf black tea
- 1 cup of unflavored, unpasteurized store-bought kombucha. I like GT’s Pure
Supplies Needed To Make a SCOBY
- A large container. It can be glass or ceramic (I recommend at least 1 gallon (3.7L))
- Tightly woven cloth (I cut out a circular pattern from 100% cotton dishcloths I had), but you can use coffee filters or paper towels to cover the jar
- Large pot to boil water and a wooden or plastic stirring utensil
- Rubber band
How To Make a SCOBY
- Prepare Sweet Tea: Bring 2 cups of the water to a boil and remove from heat as the water starts a rolling boil. Dissolve sugar into it and give it a gentle stir. Add tea bags or loose-leaf tea and steep for 20-25 minutes.
- Cool to Room Temp: Take the remaining 5 cups of cool water and add to sweet tea, which should bring the mixture down to room temperature. You should shoot for a temperature between 68-85 degrees F, 20-29 C. Test with a digital thermometer, as higher temperatures can damage your SCOBY.
- Remove Tea Bags: OR completely strain the loose tea leaves from the liquid.
- Add Store Bought Starter Kombucha: Pour your sweet tea from your pot into the fermentation jar, then pour the store-bought kombucha in, making sure to include any sediments from the bottom of the bottle if possible, as these will help kickstart the fermentation.
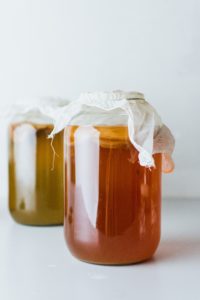
- Cover Jar: Cover the fermentation jar with a few layers of tightly woven cloth and secure it with a rubber band to keep bugs and other nasties out of your brew. If you don’t have anything cloth, I’d recommend using a few paper towels in a pinch.
- Ferment: Place the jar in a still place where you can maintain an average room temperature of around (70-75 degrees F, 21-24 C). Most importantly, keep the fermenting kombucha out of direct sunlight, which can hinder the SCOBY from forming and growing into a healthy culture. Your SCOBY should be ready within 1-4 weeks when a ¼ inch (½ cm) SCOBY has formed.
Brewers Notes
- Don’t use cheesecloth to cover the jar as it’s too easy for small insects like fruit flies to get through. Opt for tightly woven cloth, paper towels, coffee filters, or napkins tightly bound by a rubber band or twine.
- Use only caffeinated black tea (No Decaf) when making your SCOBY, as it’s the most nutritious for growth. You can use different teas during the first fermentation, which will be the next step in our brewing process.
- SCOBY’s form best when using plain granulated white table sugar; organic is also acceptable. Avoid using honey or sugar substitutes. The former can contain botulism bacteria, and if grown exponentially, as is done when brewing kombucha, it can be dangerous! The latter just won’t provide any nutrition for your SCOBY to grow. If you’re concerned with using what seems to be a lot of sugar, just remember it’s for the SCOBY, and most will not be present in the final product.
First Fermentation
You grew a SCOBY from nothing, and now you’re ready to use it to make your first batch of Kombucha.
I’m sure you’re starting to see how brewing your kombucha is fun and can be done for a fraction of the cost of buying store-bought bottles at $3-5 dollars a pop.
Keep reading to use this easy-to-follow method and basic kombucha recipe to learn how to brew up to one gallon of raw finished kombucha.
Kombucha Ingredients & Ratios
- Filtered Water
- White Sugar
- Tea Bags or Loose Tea (you can use a metal tea ball)
- Starter Tea or unpasteurized store-bought kombucha
- Active Kombucha SCOBY
| One Quart Batch 1½ teaspoon loose tea OR 2 tea bags¼ cup of sugar3 cups of water½ cup of starter tea or unpasteurized store-bought kombucha | Half Gallon Batch 1 tablespoon loose tea OR 4 tea bags½ cup of sugar6 cups of water1 cup of starter tea or unpasteurized store-bought kombucha | One Gallon Batch 2 tablespoons loose tea OR 8 tea bags1 cup of sugar12 cups of water2 cups of starter tea or unpasteurized store-bought kombucha |
I prefer to brew in 1-gallon batches because I love to drink a lot of Kombucha, and it’s the typical brew size for most kombucha homebrewers, but if you’d like to scale down, just follow the ratios listed above.
Supplies Needed To Make Kombucha
You can use the same gear listed above under ‘How To Make a Kombucha SCOBY.’
How To Make Kombucha For Beginners (One Gallon Instructions)
- Prepare Sweet Tea: Bring 7 cups of the water to a boil and remove from heat as the water starts a rolling boil. Dissolve sugar into it and give it a gentle stir. Add tea bags or loose-leaf tea and steep for 20-25 minutes.
- Remove Tea Bags: OR completely strain the loose tea leaves from the liquid.
- Cool to Room Temp: Take the remaining 7 cups of cool water and add to sweet tea, which should bring the mixture down to room temperature. You should shoot for a temperature between 68-85 degrees F, 20-29 C. Test with a digital thermometer, as higher temperatures can damage your SCOBY.
- Empty Jar & Remove SCOBY: Thoroughly clean your hands, then transfer SCOBY to an equally clean plate. If this is your first kombucha batch, put aside 2 cups of the liquid the SCOBY was growing in (this can be your starter kombucha), or use the unpasteurized store-bought kombucha. If using the same liquid the SCOBY was growing in, discard the rest; it doesn’t taste good.
- Add Starter Tea: Pour the sweetened tea into your jar, then pour in unflavored starter kombucha (2 cups reserved from SCOBY or store-bought). With clean hands, place SCOBY into the jar.
- Cover Jar: Cover the fermentation jar with a few layers of tightly woven cloth and secure it with a rubber band to keep bugs and other nasties out of your brew. If you don’t have anything cloth, I’d recommend using a few paper towels in a pinch.
- Ferment: Place the jar in a still place where you can maintain an average room temperature of around (70-75 degrees F, 21-24 C) for at least seven days and up to 30 days. Remember, the longer it ferments, the less sweet and acidic the kombucha will be. Most importantly, keep the fermenting kombucha out of direct sunlight. The longer the kombucha ferments, the less sweet and more vinegary it will taste.
Brewers Notes For First Fermentation
- Unlike when creating your SCOBY, other tea varieties can be experimented with during 1F. Try green, white, or oolong teas. Many brewers stick with a 50/50 ratio of black & green teas as a solid base. Still, part of the fun of brewing is the ability to create great-tasting kombucha, so don’t be afraid to mix things up
- Once fermentation has completed, don’t forget to reserve 2-cups for your next 1F batch before moving on to the last step, the second fermentation 2F.
Second Fermentation and Bottling
You’ve created a SCOBY, first fermented a batch (maybe your first batch) of kombucha, and now you’re ready for the last (and optional) but arguably the most fun step in the brewing process, flavoring and fizz.
I like my kombucha moderately carbonated, so this step is a must. Still, suppose you prefer a less fizzy kombucha. In that case, you can refrigerate and drink the finished brew from your 1F (first fermentation) as is and just enjoy the fermented tea with no additional flavoring.
Second Fermentation Flavoring Ideas
- Of course, some brewed kombucha from your first fermentation.
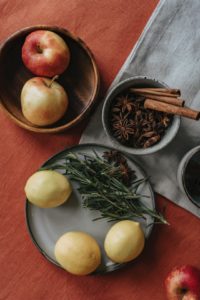
- You can add sweeteners like sugar, honey, fruit, or juice. Additionally, you can add herbs and spices like mint, spearmint, peppermint, sage, and rosemary. You will need to experiment here or just get this. Brewers tip: Fresh ginger is always an excellent addition to 2F.
Ratios for Flavoring Kombucha
- If you’re using fresh, frozen, or dried fruits, you should look for a 10-30% fruit to 70-90% kombucha tea ratio.
- If you’re using fruit juice, go for a 10-20% juice to 80-90% kombucha tea ratio.
- When flavoring with herbs and spices, remember that these vary widely with variety and strength, so you will need to test and experiment to determine ratios that lend to your taste buds.
Second Fermentation Supplies
I highly recommend using airtight Grolsch style bottles as they will do the best job of not allowing the carbonation created by the fermentation gases to escape. I’ve tried using canning jars and recycled store-bought kombucha bottles, but they aren’t as good at keeping the carbon dioxide in to create fizzy kombucha tea.
Instructions
- Bottle: Transfer kombucha tea from the first fermentation into bottles leaving about 1-2 inches of headspace at the top.
- Flavor: Add chosen flavorings and mix to combine with kombucha tea.
- Ferment: Place the bottles in a warm dark spot and allow them to ferment for 2-14 days. After two days, start taking daily samples to taste test. Not only will this allow you to see if it’s ready, but it will also burp your bottles, so they don’t explode.
- Enjoy: Yay! You’ve brewed a batch of kombucha from start to finish, strain out any fruit debris if desired, and enjoy a fresh glass; you most certainly deserve it.
Brewers Notes For Second Fermentation
Though rare, built-up Co2 in bottles can cause bottle bombs. It’s best to burp your bottles (open then close the top) once daily to avoid explosions. The warmer the temperature, the quicker your bottles will carbonate. If you have colder conditions, use a heating pad to help your bottles maintain the desired temperature of about 70-75 degrees F, 21-24 C.
Final Thoughts
This recipe will be the backbone for all of your Kombucha creations, so make sure to bookmark this page and come back to it for reference.
Now you can experiment with flavors, try to clone your favorite store-bought brands, and convince your friends and family that your kombucha is incredible and they don’t know what they’re missing.
Cheers!